
Greets to my peeps, and to eybody reppin’ the 512! Wade Walker back in the house, and hype for some third-time tutorialization.
I also return to the dwelling! Debonair of aspect, felicitous of phrase: “Stitio” is my nom-de-guerre!
Hey, did I miss something? I thought your name was “Interstitius” or something Latiny like that.
“Interstitius” was not so swashbuckling as I had hoped. This shorter, Italianate version should manifest my dashing and adventurous persona to any pulchritudinous lady-beings who may chance upon these writings.
That kind of sounds like you’re an alien AI impersonating a Renaissance Italian Musketeer.
Even so! You have seized upon the very crux of my intent!
People keep telling me that.
So! In our last tutorial, me and the mutably-named Stitio showed how to speed up the rendering in our cross-platform scientific application by using OpenGL’s vertex buffer objects.
This time, we’ll show you how to create true native binaries for these sorts of Eclipse RCP apps. This lets you distribute them the same way as non-Java apps, so you don’t have to use wrapper scripts or other hackery.
Ante-ante-prelude: An overview of how “Java apps” are normally launched
When you compile a Java app, it’s turned into .class files, one per Java class. Eclipse puts them into the “bin” or “classes” directory inside the project directory. Here are the .class files for our previous tutorial:
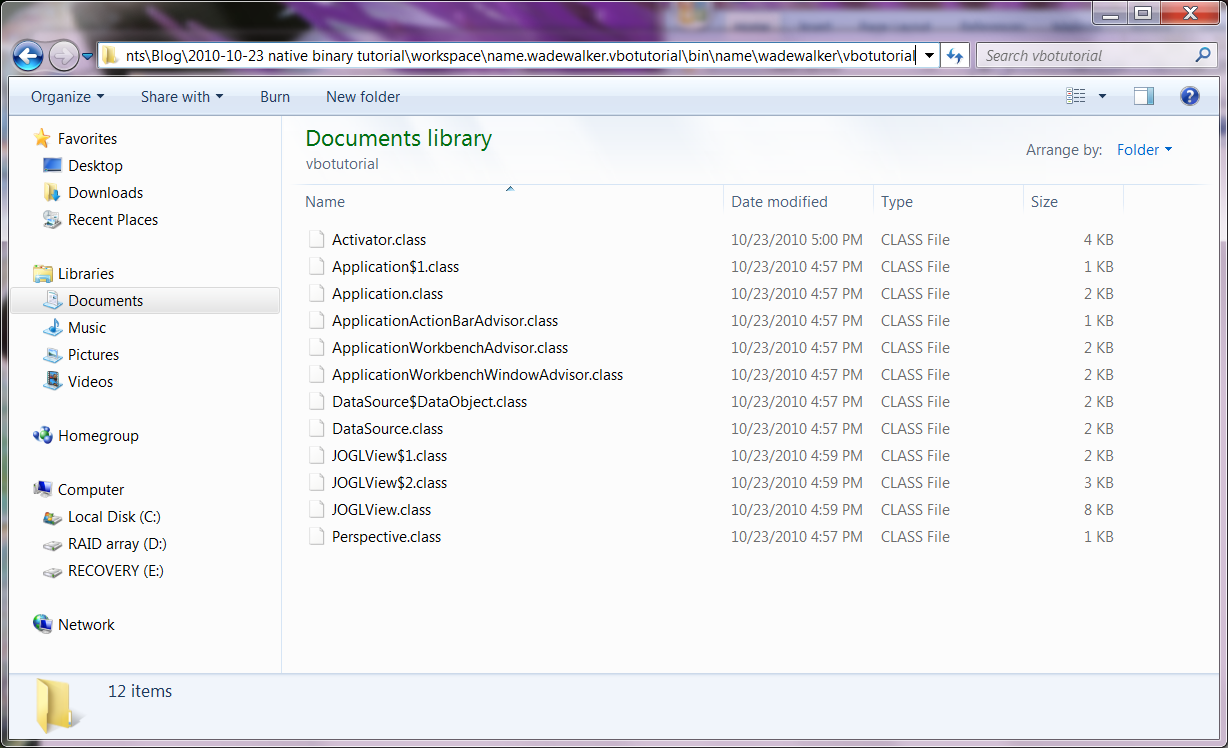
These files are full of platform-independent Java byte code that the Java virtual machine (JVM) interprets. To run an app that’s compiled into a directory of files like this, you have to type
java –classpath MyClassDir MyMainClassName
But some users are gonna be put off by this. It would be nicer if you could just double-click “MyApp.exe” to run, like for a normal app.
We can get closer to that by packaging our .class files into a single JAR (Java ARchive) file. Here’s how you do it:
jar cfm MyApp.jar MyMainClassName MyClassDir/*.class
This makes a single .jar file containing all your .class files, with a “manifest” file inside that tells Java which class is your main class. Then you run it like this
java -jar MyApp.jar
Or on Windows if you have a Java Runtime Environment (JRE) installed, you can just double-click the JAR file and Windows will add in the java -jar for you.
They call these kinds of .jar files “executable JARs”, but they’re not native binary executables, they’re really just zip files full of .class files. And this type of JAR can’t hold the native libraries that are in Java OpenGL, because those libraries have to be sitting on the file system separately so the operating system can see them.
Ante-prelude: How might one create a “Java native binary”?
Well, there’s no way to do it by using the “java” and “jar” commands that come with a Java installation. You have to use some third-party system. If we weren’t already using Eclipse, we might use something like launch4j or JSmooth.
But! Eclipse itself comes as a native binary, and it has its own built-in system that lets you create similar ones for your Eclipse RCP apps. Take a look at the Eclipse installation:

You can see there’s a small native binary, “eclipse.exe”, plus a bunch of directories. These directories contain all the JAR files and other stuff that’s part of Eclipse. When you run “eclipse.exe”, it finds the JRE on your system, unpacks any native libraries into its “configuration” directory, shows a splash screen, then runs java -jar SomeEclipseJARFile.jar for you.
But why is there so much stuff in this installation directory? It’s possible to make a Java native binary that’s one single executable file: an executable header with the JAR file appended. So why doesn’t Eclipse do it like that?
Several reasons. First, having a “plugins” directory lets you drop additional JARs into the installation. You need to do this if your app is something like Eclipse, where you can download and install new features over time.
Second, if your app contains native libraries (.dll or .so files), they need to be unpacked and written out as separate files before the operating system can load them. Eclipse does that for you, and hides them down inside the “configuration” directory.
Third, the “eclipse.ini” file let users pass extra startup arguments to the app or the JVM without having to put them on the command line every time.
And fourth, you can include a “jre” directory in the installation that makes your app completely independent of any Java installation on the host computer.
So, bottom line: Eclipse’s native binary system is complex, but gives you lots of options and room to grow your app into something bigger later on.
Prelude: We augment our Eclipse installation
Eclipse can already export native binaries for the platform you’re running it on. But if you want to export native binaries for all the other platforms at the same time, you have to install the Eclipse Delta Pack. To find it, start at the Eclipse download site and click the “Other Downloads” link under “Eclipse Classic”.

Then click the version of Eclipse you’ve got installed under “Build Name”. I’ve got version 3.6.1 installed.

Then finally click on the delta pack download link. The one I got was “eclipse-3.6.1-delta-pack.zip”.

Unzip this file where you want to install the delta pack. I put it beside my Eclipse installation and called it “eclipse-3.6.1-delta-pack”. You can also unzip it directly onto your Eclipse installation, but everyone seems to advise against that. Here’s how mine looks.

We still have to tell Eclipse where to find the delta pack, but we can’t do that until we set up our workspace, since Eclipse stores that setting in your workspace’s “.metadata” directory.
Intermezzo: For expediency’s sake, we re-use our previous project
We’ll use our previous masterwork as a starting point. First, create a new workspace directory and unzip this file and this file from the last tutorial into it. Then follow the instructions from the last tutorial to import those projects into your workspace.
Or, as usual, if you just wanna skip to the end of this tutorial without all the typing and clicking, create your new workspace directory and unzip this file and this file into it, then import the projects. You’ll still have to point Eclipse at your delta pack, though.
Entremet: We inform Eclipse as to the location of our “delta pack”
Now that we have a workspace to store these settings, click “Window > Preferences” from the menu, open “Plug-in Development” on the left, click “Target Platform”, and select the “Running Platform” on the right. Then click “Edit…”.

When the “Edit Target Definition” dialog appears, click “Add…”.

Then select “Directory” and click “Next”.

Enter the directory where you put the delta pack. Mine is right beside Eclipse, so I can do it like this: “${eclipse_home}\..\eclipse-3.6.1-delta-pack”. Then click “Finish”.

Now you should see the delta pack in your platform like this. Click “Finish” again.

Finally, click “OK” to dismiss the Preferences dialog. Eclipse will grind for a moment, then the delta pack is in! Just remember, if you make a new workspace later, you gotta do this again.
Opus: The creation of our “product”
Now we tell Eclipse what it needs to know to export our tutorial as native binaries. Right-click the “name.wadewalker.tutorial” project in the Package Explorer and select “New > Product Configuration”. Enter “Tutorial” as the file name, then click “Finish”.

This creates a new file “Tutorial.product” in the “name.wadewalker.tutorial” directory. This file will hold all the settings we need to export native binaries. It should look like this to start with:

Now change the version to “1.0.0”. Click the “Application” drop-down and select “name.wadewalker.vbotutorial.application”.

Then click the “Launching” tab at the bottom of the Tutorial.product window. Enter “Tutorial” as the launcher name.

Then click the “Overview” tab to go back, and click the “Eclipse Product export wizard” link to start the native binary export.
When the export wizard comes up, set the root directory to “bin”. Then set the destination to an empty directory where you want the native binaries to go. I put mine in a directory called “installation” beside the workspace, but it can be anywhere. Minor annoyance: this apparently has to be an absolute path. Then check the “Export for multiple platforms” box and click “Next”.

Check the boxes of the platforms you want to export to. I’m doing Linux GTK 32- and 64-bit, Mac OS X Cocoa 64-bit, and Windows 32- and 64-bit. I don’t have a way to test the Mac version right now, but we can at least see that it exports. Click “Finish” to start the export process.

Exporting takes a minute or so, but once it’s done you should see this in your destination directory:

There’s one directory per platform, and one common “repository” that holds JARs and other files that are the same for all platforms. If you look down inside the “win32.win32.x86_64\bin” directory, you’ll see an installation that looks just like Eclipse:

Double-click on that executable, and pow! Here’s the binary running on Windows 7 64-bit:

And onomatopoeia! Here it is on CentOS 5.4 64-bit:

Now you can write one Java OpenGL app, export it, and get native binaries for five different platforms at once. And that, my friends, is super-genius-ness in action!
Postlude: Where further customization is left for your amusement, chiefly due to our laziness
You can see from all the tabs and fields of the “Tutorial.product” file that there’s a lot more customization you can do. You can put in a custom splash screen, custom icon, custom JVM arguments, and a lot more.
One thing that doesn’t work right as of Eclipse 3.6.1 is the “Bundle JRE for this environment with the product” check box on the “Launching” tab of “Tutorial.product”. If you check the box, re-export, and compare the exported product to the one you had before, you’ll see they’re freaken identical.
But then we open up the smartness hose on this problem. Find the JRE directory of your system’s Java installation, which looks like this:

Create a new directory in your app’s installation (under the same platform as your system) and name it “jre”. Then copy the contents of the above JRE directory into it. Now that platform in your installation should look like this:

And now when you double-click your “Tutorial.exe”, it will use the “java.dll” and “jvm.dll” from this new “jre” directory instead of using your system’s installation of the JRE. I’ve confirmed this with Windows Process Explorer, and I’ve done it on Linux the same way. The Eclipse launcher always looks here first, so we’re just putting a JRE right where it expects to find one.
I usually put this annoying little step in an installation script. I custom-made a zipped JRE for each platform, and I have the script unzip them into the right directories during the install process.
Resources which the reader may find helpful
Windows Process Explorer: Get it here. It helps verify that you’re really getting the JRE from where you think you are. It’s also handy for seeing where the JOGL DLLs get unpacked to.
Eclipse product configurations: There’s a tutorial from Lars Vogel here that has more details than I give.
A list of the revisions which we have made to this document

Pingback: Tutorial: Displaying Java OpenGL in an Eclipse editor with a menu bar and a run/pause button | Wade Walker's blog
Thanks for this huge explanation.I will try it soon 🙂 .
Awesome tutorial, thanks!
Glad you guys like it! I’ve put the next tutorial on hold for a bit while I do my best to help the JOGL 2 guys over at jogamp.org, but I’ll pick this series up again soon. In the meantime, if you have any ideas for future tutorials, or suggestions to improve this one, please let me know.
this is great, thank you!
Very interesting, but I am baffled as to how I can use it for my own project. Seems you need a product configuration to start with, but how do you create one from scratch? I tried and gave up when I got the point where I had to guess what the “defining plugin” might be.
Incidentally having followed the tutorial, the executable (Tutorial.exe) fails with the message “javax.media.opengl.GLException: Error: attempted to make an external GLContext without a valid pixelformat”.
I’m a fairly recent convert to Java from Delphi and C#, and have been loving it until I tried to export my Jogl application from Eclipse!
Hi Stephen,
The tutorial mentions how to create the product configuration (right-click the project, then click “New > Product Configuration”). Does this not work correctly? Or do you mean that the name.wadewalker.vbotutorial.product is not present when you try to create the new product configuration? If that’s the case, you might need to run the previous tutorial first to create that name.wadewalker.vbotutorial.product.
Could you also tell me your OS version, graphics card model, graphics card driver version, and Eclipse version? I’ve seen the “valid pixelformat” error before on some older Windows XP platforms, and sometimes it can be fixed by upgrading the graphics card drivers. If not, we can try to debug this in more detail.
Thanks for the rapid response and apologies for the delay in replying – I had a few days off (watching my kids learn to sail).
I had no problems going through your tutorial as such. My confusion was how to apply this to my own project.
I’ve now worked through your first tutorial and then this one (skipping the second) – and I can export the rotating wire-frame torus which works fine. I now understand where the product configuration comes from.
Do all Eclipse JOGL projects have to be created as plugins then (unless they are never to be exported from the IDE)? My project was based on an elaboration of “Justin’s Getting Started with JOGL 2 Tutorials” (https://sites.google.com/site/justinscsstuff/jogl-tutorials). But those tutorials say nothing about exporting.
Next step: I will follow the same process and try to adapt my own code to it.
Pending getting a new workstation, I’m just using a small laptop (Samsung NC10) on which my JOGL code works fine, as does the Delphi app I am converting. It runs Windows XP SP 3. There is no graphics card as such, just “Mobile Intel(R) 945 Express Chipset Family”. I’m using Eclipse Classic 3.7 (Indigo).
Hi Stephen,
No apologies needed — hopefully the sailing was fun 🙂
As it sounds like you have guessed, Eclipse projects that you want to export as native binaries have to be created as plugins (i.e. as RCP applications). That’s because the binary export feature reuses the same launcher and infrastructure that Eclipse itself uses, and Eclipse itself consists of plugins. If you look inside your exported RCP application and compare it to your Eclipse installation, you’ll see that they are very similar.
The Eclipse plugin fragment mechanism (the one we used to create the JOGL plugin fragments in the project) also contains the magic that allows us to build a single application that can run on five different OS/HW platforms. When you launch your exported application, the Eclipse framework finds the correct native JOGL libraries for the current platform (which it zipped up in the export process) and unzips them into a temporary directory where the JVM can find them.
Success! My own OpenGL model runs within the framework that you’ve described, and has been exported to a working exe. I’m feeling a whole lot better now! Thanks.
For now I just pasted my existing main() method’s code into the createPartControl() method, since I don’t yet understand how the org.eclipse.swt.opengl stuff works – which means I get a second window (a Frame) popping up with the 3D model in it.
Glad to hear it works! It sounds like all you have to do now is convert the top level of your application from AWT to SWT, and you’re all set. You might find the tutorial at http://jogamp.org/wiki/index.php/Using_JOGL_in_AWT_SWT_and_Swing#JOGL_in_SWT_using_the_SWT-AWT_bridge to be helpful — it shows how to embed an AWT frame into an SWT Eclipse app.
I’ve now refactored my code to separate the JOGL and AWT related parts, which improves its structure anyway. In doing so I realised that TextRenderer, which I have used to label shapes, is AWT so presumably there is a different way to render 3D text in SWT?
I also worked through your excellent “Using JOGL in Java Web Start” tutorial (http://jogamp.org/wiki/index.php/Using_JOGL_in_Java_Web_Start) which provides an alternative deployment route. It would be nice if there was a way to do that in an Eclipse wizard rather than using command line tools though.
Thank you so much for these tutorials and for you helpful comments.
TextRenderer works fine in SWT projects — I’ve used it in large projects at work with no problem. It does take a bit of coddling to get good performance, though. For example, we had to clip offscreen text ourselves, turn off text when it’s too small to read, and make sure that we call begin/end render as few times as possible (see http://forum.jogamp.org/JOGL-High-performance-text-rendering-tp1319060p3157747.html for details about that last item).
I’m currently working on an Eclipse version of the Java Web Start and Java Applet tutorials that uses an Ant makefile to automate the JAR signing. If you’d like to take a look at what I have so far, just request it over in the JOGL forum and I can post it there.
It’s also possible to deploy an Eclipse RCP app using Java Web Start — I’ll do a tutorial on this at some point, but first I have to figure it out myself 🙂
I’m building on mac and trying to run on windows. My rcp app starts up on windows, but the JOGL part isn’t there or isn’t visible anyway. No errors or warnings that I can see. What debugging options are available for figuring this out?
Hi cirias,
The first place to check is in the .log file that’s created in the \win32.win32.x86\bin\workspace\.metadata directory after you double-click on the Tutorial.exe. If something went wrong during startup, you should see an error message in there.
Thanks for the quick reply! I thought I had looked for a log file, but maybe I missed it due to the hidden nature. Anyhow, that revealed that I had bungled when making my JOGL projects and left out some files. Adding them fixed the problem.
Now I’m wondering if the size I’m seeing for the exported app can be improved. I’m at about 240MB for five platforms with a fairly skeletal app. Is this to be expected?
Glad to hear things are working now!
There should be at least two ways to shrink the size of those binary installations:
1. Reduce the amount of JOGL stuff you include. In my example, I put all of JOGL in there, but there are some things you may not need for your app, like NEWT or the mobile stuff that’s in the newer JOGL builds.
2. Remove any unused dependencies in Tutorial.product on the Dependencies tab. I’ve never tried it, but I’d be willing to bet there are a few things in there that aren’t needed in every RCP app. This might take a bit of trial and error, though, since if you remove something that’s needed, you’ll get a failure on launch.
I’ve been able to shrink things slightly by removing NEWT and mobile stuff. I think most of the bulk is RCP stuff. I think you’re right that it will be tedious to reduce that.
Hello!
When i try to export my Application to OS X x86_64, I’m getting a weird error that says:
Processing inclusion from feature org.eclipse.equinox.executable: Bundle org.eclipse.equinox.launcher.cocoa.macosx.x86_64_1.1.100.v20110502 failed to resolve.:
Additionally, if I try to run the prduct that was generated with the macosx x86 configuration, it doesn’t start and i get a quite long error log: http://tinypaste.com/7b15b2e2
I hope you can help me,
BigTeddy
Hi bigteddy,
Did you add the “delta pack” to your Eclipse installation as described in the tutorial? The bundle that’s failing to resolve is inside the delta pack at eclipse-3.7.2-delta-pack.zip\eclipse\plugins, and should be visible when you add the delta pack to your target platform (in the “Edit Target Definitions” dialog box). Also, make sure the delta pack you added matches your Eclipse version — I noticed they moved the Eclipse 4.0 stuff into the default spot on the web site, so you might have gotten the wrong one by accident. And finally, if you have more than one Eclipse workspace, make sure you add the delta pack when the workspace containing your JOGL project is open. The delta pack settings apply to the current workspace, so if you switch to another one the delta pack won’t be visible.
Also, what versions of Eclipse and Mac OS X are you using? I can retry this on the Mac if you keep seeing problems, to make sure these instructions still work with the latest Eclipse.
Siting here tearing my hair out for numerous problems. What I am wondering is why it always is so bloody hard to move something from a testbed to a real distributable. Common sense dictates that it should be the other way around. What is the deal with writing code for a virtual machine, if I still have to manage native code for all the different platforms? Much rather just write it in C/C++ and use the bloody preprocessor to compile something for the target platforms and dealing with said platforms libraries myself, then put my trust into something completly random like “eclipse equinox”. Why is that it is 2012 and still there is hardly no decent standardization of platforms?
A trivial thing like the vendor of the drivers for the graphics card can mean the difference between a program running properly on one machine and not on another, and even then both NVidia and ATI are part of Khronos(or is ATI?)? Why sign up to specifications if they dont follow them?!
It’s all good for a huge company to deal with all the platform quirks, but as a hobbyist developer it feels like I spend more time dealing with shit like this instead of writing programs! GAAARGH!
Mad props to you WW though, for trying to guide us through this shitstorm(a very comprehensive and detailed guide at that).
Cross-platform 3D graphics apps are difficult to get right, no doubt about that 🙂 That’s the whole reason I’m writing these tutorials, to put information out there which will hopefully help other people avoid a lot of difficulty.
Distribution of a 3D app is always going to be painful, regardless of how you write it. Even if you’re writing only for one platform in raw C++, each individual model of graphics card and driver version, on each OS version, can still exhibit unique bugs. nVidia and ATI are both in Khronos, but the OpenGL spec is so big and imprecise that no two companies can produce completely identical implementations, no matter how hard they try.
I always have to remind myself not to get too wrapped up in making my app perfect for everyone, everywhere. I just try to make it the best I can, and stay focused on what my app is supposed to accomplish for the users, rather than how it’s written.
Cannot complete the install because one or more required items could not be found.
Software being installed: JGine 1.0.0 (com.tedl.jgine.product 1.0.0)
Missing requirement for filter properties ~= $0: JGine 1.0.0 (com.tedl.jgine.product 1.0.0) requires ‘com.tedl.jgine.product_root.win32.win32.x86 [1.0.0]’ but it could not be found
Eclipse 3.72
What does this mean? At any level?!?
It looks to me like it is missing the dependency for the fragment that deals with windows x86, but it does not!
I tried downloading your project and looking at the product file, I can’t seem to export that neither. I have not even been able to export a HelloWorld for win x86 properly, I always get that weird error.
And by the by, I hope that when(if) I ever manage to export this product, all my textures and .obj files will be all wrapped nicely into… something? It’s not like they just put the directories like it’s in the project, right?
Usually when I see this kind of error it means the x86 fragment is missing. You’ve already checked, but I’d double-check your ProjectName.product file’s Dependencies tab to make sure all your fragments are listed and none have a red “x” on them.
Also, it’s a bit worrying that I see the string “_root.win32.win32.x86” in your error message. Is your x86 fragment really called “com.tedl.jgine.product_root.win32.win32.x86”? The suffix there looks like the one SWT uses for its own fragments.
You might also try checking the log files (both the Eclipse workspace .metatdata/.log file, and the log file created in the export directory when you try to export your project). Sometimes the export process can fail, and the log will contain more info than it shows you in the console.
I’d also try checking your fragment projects’ platform filters to make sure they’re syntactically correct — your error message with that “filter properties ~= $0” looks like Eclipse is choking on something.
Finally, you might try my tutorial unaltered, just to make sure you can do the export at all. Sometimes that will expose a problem with your environment or setup.
Sorry for keeping you hassled, but I create a new plug in project, set it to be a RCP project, eclipse generates an application.java file which outputs some text to the system.out. I take this project, right click it and create a product for it, export it for windows x86, x86_64. It exports fine, but no executable is generated in the target folder?
I am trying to look up guides on eclipse RCP products/deployment, but there hardly seems to be any.
I tried a totally fresh plugin creation and export just now, and it works fine for me (Windows 7 64-bit, Eclipse Indigo SR 2 with no delta pack, Java 1.7.0_03). I created a new plugin project called TestPlugin, set it to be an RCP app, and used the RCP Mail template (so it doesn’t use any JOGL or any other outside code). Then I set up the product configuration as described in my tutorial and exported it. It creates two directories (bin and repository), and the binary is at bin\TestPlugin.exe. When I double-click that binary, the project launches properly.
One thing I have noticed is that sometimes the RCP export can get confused if it’s got junk stored in workspace/.metadata. So one thing to try is rename your .metadata directory to something else, restart Eclipse (which generates a fresh new .metadata directory), re-import your projects into the workspace, then try the export again. This has worked for me in the past when I had a wrong environment variable and tried to export. Eclipse somehow got this wrong value stuck in .metadata somewhere and couldn’t get rid of it without me forcing a .metadata refresh.
If you want another tutorial on Eclipse RCP export, try Lars Vogel’s tutorial at http://www.vogella.com/articles/EclipseRCP/article.html. This is how I learned it initially, and he walks you through every step of the process in great detail.
Renamed the .metadata filter, since I run windows vista I of course had no initial permission to do but resorting to some tricks that tired old bag of rotting cabbage gave up. I managed to produce one product that generated an .exe file(not using the delta pack). I then managed to produce my stuff, also generating a .exe, without that incomprehensible error message. However, when I try to run it I get this:
java.lang.IllegalStateException: Unable to acquire application service. Ensure that the org.eclipse.core.runtime bundle is resolved and started (see config.ini).
at org.eclipse.core.runtime.internal.adaptor.EclipseAppLauncher.start(EclipseAppLauncher.java:74)
at org.eclipse.core.runtime.adaptor.EclipseStarter.run(EclipseStarter.java:344)
at org.eclipse.core.runtime.adaptor.EclipseStarter.run(EclipseStarter.java:179)
at sun.reflect.NativeMethodAccessorImpl.invoke0(Native Method)
at sun.reflect.NativeMethodAccessorImpl.invoke(Unknown Source)
at sun.reflect.DelegatingMethodAccessorImpl.invoke(Unknown Source)
at java.lang.reflect.Method.invoke(Unknown Source)
at org.eclipse.equinox.launcher.Main.invokeFramework(Main.java:622)
at org.eclipse.equinox.launcher.Main.basicRun(Main.java:577)
at org.eclipse.equinox.launcher.Main.run(Main.java:1410)
org.eclipse.core.runtime is listed in the dependencies. And by the way, I can’t seem to find any of the .dlls that were part of the fragment for my platform, are they turned into something else?
I also have some .obj and texture files that I load with getResourceAsStream, will they somehow be included in the native launcher, so that I don’t need to change the way those resources are loaded?
If this had been part of some professional work, I would have tossed it the fuck out of the window a long time ago and tried something else, but now I am really sour and want to get it working.
Thanks for helping me out though.
Well, it sounds like you’re making progress 🙂 I’m glad refreshing your .metadata fixed the missing .exe problem and allowed you to export the sample app correctly.
For your own app, one thing you can try is turning on more debugging options when you run it. There are tons of different ways to do this explained at http://www.eclipse.org/eclipse/platform-core/documents/3.1/debug.html, but one of the easiest is just adding “-debug” to the program arguments on the YourName.product Launching tab. With more debugging turned on, the log output may make it obvious what’s missing. Sometimes you end up needing to add plugins to the YourName.product Dependencies tab.
The .dlls and .objs that are part of your project should be included in the exported product as long as they’re checked in the MANIFEST.MF Build tab under “Binary Build” (just like you had to do for the JOGL .dlls). Eclipse wraps them up into JAR files that are part of the exported product, which is why you can’t see them directly in the file system. If you look at the exported product inside the installationdir\repository\plugins\ProjectOrFragmentName_version.jar files, you should see your resources there.
When Eclipse runs, it includes these JARs on the classpath, so if you use getResourceAsStream() it should find your files. The .dll files are found by System.loadLibrary() via Eclipse’s custom classloader, which adds more search paths to the default paths where System.loadLibrary() usually looks. The Eclipse framework extracts the .dlls from your JARs and puts them in a temporary directory so this can work properly.
After some experimentation I found that I need to have org.eclipse.core.runtime in the start levels(and it NEED to be set to auto start), as well as the plugin project for which the product is made. I did not need to do that for the HelloProduct I wrote, possibly because HelloProduct did not use any fragments. I think that is kind of weird, because the runtime is included in the dependencies as well.
Now I am trying to find the error log the RCP outputs, because it rudely shuts down the console box. My ninja like reflexes coupled with the print screen key however allowed me to take a picture of the console box just before it closes, and it appears that an exception is thrown when compiling one of the shaders(a debug shader for looking at array textures).
I am writing this here in the hope that it will help any one else that faces this ordeal.
Okay now I know for sure that the delta pack is the culprit, I can export just fine for my current platform without it, but when I use the delta pack I can not export for any platform, including the one I am currently running on.
I also tried to export without native launcher artifacts, figuring I could include a script to launch the application, but then the configuration folder has ouputed nothing for the eclipse.core.runtime and eclipse.core.osgi.
I also noticed that If i try to extract the delta pack zip, I get an error message that says “can’t open output file”(something like that).
I also noticed that in this tutorial you find 87 plugins in you delta pack, I only find 80(though I am using delta pack 3.7.2 since I am running eclipse 3.7.2). I get the feeling that this is a dead end, that eclipse with my current setup CANT export to several platforms, although I will keep investigating.
Sorry for double posting, but I finally found the solution: AT LEAST for the following configuration, eclipse delta pack does not work:
windows vista SP 2, using Eclipse 3.7.2 with Delta pack 3.7.2.
What I did was that I actually downloaded a legacy version of Eclipse, the one you were using for this tutorial, as well the delta pack for that version, both 3.6.1.
So if anyone else has the same problem: try installing an older versions of Eclipse, 3.6.1 seems to work for me, you can download them from eclipses’ archives found here:
Eclipse 3.6.1
http://archive.eclipse.org/eclipse/downloads/drops/R-3.6.1-201009090800/eclipse-SDK-3.6.1-win32.zip
Delta pack 3.6.1
http://archive.eclipse.org/eclipse/downloads/drops/R-3.6.1-201009090800/download.php?dropFile=eclipse-3.6.1-delta-pack.zip
I also found out what the output error was, yet again it was Windows Vista being a dick, I did not get to extract the files directly into C:\Program Files, I had to first extract them into a intermediary directory for my user(which as far as I know I have set to have EVERY god damn privilegium, because I am the only one using this computer, and I am just a bit to savy to fall for “delete system32, makes you computer run faster” tricks by now) and then move them beside the eclipse install.
I am a bit surprised that I had to get an older version of eclipse to make it work, I thought they had automated tests and stuff at eclipse.
Anyways, thanks for all the help WW, been a great sport, and I hope that if someone else runs into this sh*t that they will find this post helpful.
I’m glad to hear you got it working! I’m on vacation now, but I’ll try the Eclipse 3.7.2 delta pack when I get back to see if I see the same problem. As you suggested, I’ll bet it’s a Windows Vista permissions problem, rather than an Eclipse problem.
I think I’m missing something.
Above you mentioned that:
“When you launch your exported application, the Eclipse framework finds the correct native JOGL libraries for the current platform (which it zipped up in the export process) and unzips them into a temporary directory where the JVM can find them”
Eclipse does not seem to be doing this for me. My plugin has the JOGL .so files for both 32 bit and 64 bit Linux. The directory hierarchy of the plugin looks like this:
pluginDir/
–>src/
–>libjogl.so
–>libgluegen-rt.so
–>x86_64/
–>–>libjogl.so
–>–>libgluegen-rt.so
When I run on 64 bit Linux I get an error a
“java.lang.UnsatisfiedLinkError: /path/to/libgluegen-rt.so: wrong ELF class: ELFCLASS32”
When I look inside the plugin jar file I see both the 32 bit and the 64 bit .so files exactly as shown above.
So eclipse does not appear to be choosing the 64 bit .so over 32 bit .so
Any suggestions?
Looks like I posted about 2 minutes too soon. I think I understand after reading your tutorial:
Tutorial: A cross-platform graphical application using Java, OpenGL, and Eclipse
You just need to create separate 32-bit and 64-bit fragments for the two different OS versions, rather than putting them together in the same fragment (as you probably saw in my first tutorial). Just let me know if you need any more help.
Hey Wade!
I did update the JOGL files and basically rebuild them from scratch thanks to your previous tutorials. Now all the examples you’ve given work and I manage to run everything. However I still have a problem with exporting – everything exports alright without any errors but I don’t seem to be able to run the macosx.cocoa.x86_64 app. It starts up but no window shows up and nothing happens. I have not checked the win and linux parts yet so I don’t know if it’s just the mac part. Any ideas on that would be really useful.
Apart from that the tutorials are really great – detailed and understandable! Good job!
Even stranger, I manage to export the torus tutorial and it works fine. However when I try the vbotutorial, just nothing really happens. The application opens in the dock and starts running (I suppose) but the window does not show up. I’ve done exactly the same things to both. The only difference is that I did not need the “-Djava.awt.headless=true” in VM Arguments for the torus, but I need it for the vbotutorial. Any ideas?
Hi Peter,
I’m glad the tutorials run now with the latest version of JOGL 🙂 Probably 95% of the time, when an Eclipse RCP program won’t start, it’s just missing a package dependency that for some reason is present when you run in Eclipse, but not when you run with a .product file or after export. Don’t worry though, if the VBO tutorial will run inside Eclipse, it’s just a matter of experimentation to get it running correctly outside Eclipse. Here are some things you might try:
1. Look at the export log. I believe there is a log file generated during the export process which may show errors and warnings that for some reason don’t show up in the console during export (at least I’ve seen this sometimes with previous versions of Eclipse (I use 3.8.2 now)). I forget where this log file is, but I think it’s somewhere down inside the exported directory.
2. Look at the program’s run log that’s generated when it tries to start up. This will often have information about some package that’s missing from the export that it needs to run.
3. Compare the .product file of your project that exports correctly to the .product file of the project that doesn’t export correctly. There may be some dependency in one of them that was forgotten or missed in the other.
I believe the java.awt.headless was necessary for me on the Mac because there was some AWT initialization code that was running during JOGL startup, but on the wrong thread (on the Mac, windowing code has to run on the app’s primary thread).
Thanks for the reply! Found the problem finally – turns out that I had to add “-Djava.awt.headless=true” in the VM Arguments of the .product file. I feel stupid now 😀 Thanks for the support and hopefully I won’t need any more help! 🙂
I’m glad it’s working! And don’t worry about asking for help — the whole reason I put these tutorials up was to help people 🙂
Hi Wade,
I know its jan 13 now, but I just stumbled across this web page. I have created my own RCP before with no problems on my laptop (win 64 bit) using eclipse indigo. Yesterday i started a new RCP on my desktop (win 32 bit) also eclipse indigo and everything seems to be working properly. But when I launch the exe a window pops up along with the application GUI. The window has the icon and the directory where it is launching from in the title and then the body of the window is black (looks like a windows command window). There are two icons on my task bar. This did not happen on my previous program. Have you had this problem before? And any ideas as to how i can prevent this from happening?
Hi Darin,
I’m not sure why you’re seeing an extra black window. I haven’t tested on 32-bit Windows lately; my primary machines are all 64-bit now.
However, one possibility is that when Eclipse creates the .exe for your exported RCP app, it’s creating a Windows console application for some reason instead of a Windows GUI application. When I create console apps using Visual Studio I see the same black window you’re seeing.
You might see if there’s some option to change this behavior in Eclipse, or try a newer version of Eclipse. I’m using Eclipse 3.8 now, and these tutorials still work with it. I have tried Eclipse 4.2, but have had some problems with the new RCP framework, so I haven’t successfully upgraded that far yet.
I have been working on this thing for a while now. It is the most bizarre thing. I looked all around for a setting and spent a significant amount of time googling. I also tried updating my version of eclipse, I am running 3.7.2, so I go to Help, Install new software, then I click on the link I used to go from Galileo to Indigo (http://download.eclipse.org/releases/indigo).I get the following message, “Cannot complete the install because some dependencies are not satisfiable
org.eclipse.linuxtools.callgraph.feature.group [0.0.2.201108301805] cannot be installed in this environment because its filter is not applicable.” Any ideas as to what is causing this. I apologize for asking, I know you are answering my question on your own time.
I’m not sure how to do an in-place upgrade from 3.7.2 to 3.8, I’ve only ever done fresh installs because I’m paranoid 🙂 I’m currently running 3.8.1, which I installed from http://download.eclipse.org/eclipse/downloads/drops/R-3.8.1-201209141540/. Don’t worry that it’s just called “Eclipse SDK”, it still works just like 3.7.2 (though with a fresh install you’ll have to re-install any plugins you have). Plugins can be installed from the Juno library at http://download.eclipse.org/releases/juno/ as detailed in http://stackoverflow.com/questions/11322349/eclipse-3-8-where-is-the-download-site.
You might also try creating the exported 32-bit and 64-bit app binaries both on your 32-bit and 64-bit systems, and checking to see if there’s any difference between them. They *should* be the same, since the Eclipse delta pack is what give you the ability to build for non-native platforms, but there might be some sort of bug that you could work around this way.
Hi Wade,
I’m trying this with Eclipse Modelling tool 4.21.0.
For adding the delta pack, I added the software url:http://download.eclipse.org/eclipse/updates/4.21 (instead of downloading & providing the directory) in target platform. But after doing this, whenever I try to run the .exe, I get: “org.osgi.framework.BundleException: Could not resolve module:” error for all modules under org.eclipse
I know this is a pretty old blog but I hope I get a response!
Thanks.
Hi Sagar,
I haven’t tried to build a native executable like this for a while, and it turns out that this procedure is out of date now that Eclipse has moved to version 4.5.0 and greater. It looks like the delta pack no longer exists (see https://stackoverflow.com/questions/49376626/why-eclipse-4-7-2-no-delta-pack-for-download), but you might try some of the suggestions in that link, to either deploy the new way, or build your own delta pack with the script they suggest. Let me know if it works!
Thanks for your response Wade!
I have already tried the new way & it has the current problem that I have mentioned.
I’ll now try the other suggestion to build my own delta pack.